Wednesday, February 25, 2009

Our First Giveaway, WAHOO!

You might have noticed that I made TWO "Spring" banners...
One for me and one for YOU!

Just leave me a comment by Sunday night and I will randomly pick a winner Monday morning.

Tuesday, February 24, 2009

Who's got the button... We do!

Yep, I figured out how to make a button for nanny goat.

Okay... I know it's probably silly for me to have a button for this little craft blog but believe it or not we've gained quite a following...
Thanks to so many of you who are spreading the word.
So if you love crafting and you love nanny goat then grab our button and wear it proudly. :)

(just copy and paste the code below onto your sidebar... and let me know if it actually works ;0)

<a href="http://littlenannygoat.blogspot.com/" target="_blank"><img border="0" alt="Photobucket" src="http://i183.photobucket.com/albums/x261/kathrynannygoat/nannygoat-button.jpg"/></a>

Banner Tutorial... finally already!

Okay my friends, I took like a bazillion pictures for this tutorial so it will be super-dooper easy to follow... I hope.


First off, decide what you want your banner to say and pick coordinating paper.
For the letters you have a few options.
If you have a circut then you are LUCKY and you can just cut out your letters with that (about 5 inches tall).
If you are like me then you need some other options:
You can always go to a scrapbooking store that has die cuts and cut your letters or...

You can find your favorite font and print the letters you need (again about 5 inches tall) on cardstock and cut them out and use them as a pattern (don't throw them away so you'll have them again for another banner another day).
That is the method I used for my Halloween banner and although it was more time consuming the banner turned out great.


These are my recent find and are perfect for making banners! I got like 10 packs on clearance at a scrapbooking store here in Louisville. You can buy them online or check out your local scrapbook store to see if they carry them or anything like them.
You also need a pattern for your scalloped circles (again, if you have a cricut then you are LUCKY). I'm including this one so you can use it to make your pattern. Just size it to 6inches and print on cardstock and cut out.
Okay, once you have all the items the rest is easy. Layout your letters... I like to alternate circles and squares.

Decide what papers you want behind each letter and cut the paper into circles or squares.
I just used a lid to trace my circles.

I like to have a solid color behind the paper to pull it all together. For this banner I chose a dark brown. Cut it big enough to create a border around the paper. I also like to round the corners on the squares.

Now pull out your distressing ink or stamp pads or chalk or even paint and use it on the edges to give your paper a finished look.

Almost done... doesn't it look pretty?!
Now pull out your eyelets... I only have 2million of those little guys... and put two in the top corners of the paper to hang the letters on the string. If you don't have eyelets just use a hole punch.
Now glue...tape... adhere all of your letters and papers so that they are secure.
Pull your string through the letters and then I like to hang it up to add the ribbons so I can space the letters and stand back and look at the colors I need.
I like to pick lot's of bright colors of ribbons and just tie them with a square knot.

Someone asked how I hang the banner. I don't do anything fancy, I just use a little clear packing tape and then I tape the ends of the string under some heavy vases I have on the mantel so they hold it in place.
If you have another idea of how to hang the banner please share in the comments.

And there you go! Too cute!
Okay Spring... I've got my banner up to welcome you... I'm ready... Spring?

Friday, February 20, 2009

Your wish is my command

Thanks for the comments and emails. I think a banner tutorial is a great idea!

I'll get started on it ASAP.

And I'm thinking about my first giveaway...

Thursday, February 19, 2009

Happy Day Banner


I know, I know, I'm pretty much obsessed with making banners.I can't help it.

Hope you have a "HAPPY DAY"!

Monday, February 16, 2009

More Mod Podge

I made these for my little girls room. I loved the way they turned out!

(much cuter in person)

all you need to make these are:

Plain white canvases from your local art supply store

Scrapbook paper (that is what I used, you could probably use fabric also)

Mod Podge- to glue the paper on and then applied over the whole thing

Buttons

Hot Glue- to attach the buttons

Ribbon

Stapler- to attach the ribbon to the canvas

There you have it, your very own wall art and everyone will think you are an artist!

Sunday, February 15, 2009

Hair Clips

I saw a friend wearing a one of these darling hair clips the other day. I thought that it was so cute that I had to make some immediately!!


They are so cute and easy to make (alligator clips, ribbon and hot glue) and the possibilities are endless. I love that the adults can wear these ones too!

**Melissa**

Thursday, February 12, 2009

Valentines Cards

I wanted to do something fun for my hubby this year for Valentines so I printed 25 of the above card and handed them out to our family to fill in what they love about him. I'm going to hide all of the notes in his car for him to find... ssshhhhh...don't tell.
I thought it would be fun this year to make our own valentine cards with photoshop elements.

The girls helped me design them and they were super easy...

I think we'll do it again next year.

On the spot

I bought "Grandma's Secret Spot Remover" from Hobby Lobby the other day because it claims it can take out all spots, including old paint... I'll believe it when I see it.

I tried it today on a spot of paint on my carpet from when I painted my little boy's room several months ago.

Guess what... it worked... I'm serious.

Tuesday, February 10, 2009

Dress Up

Every little kid needs a box full of dress up clothes, Right? I am getting a head start. My baby is 10 weeks old, and a girl :)


**Melissa**

Wednesday, February 4, 2009

Valentines Wreath

I saw these on Little Birdie Secrets and a craft day was born!


She used Elmers glue I however, has having a hard time with that so I opted for hot glue.


(Love my hot glue gun!)
So cute! So easy!

Monday, February 2, 2009

Cork Boards

Last summer I wanted to make a vision board but couldn't just hang my pictures on a boring old poster board so this was the solution, a fun, real cork board.

Here is how we made them:

#1- We purchased unpainted open back frames from Michael's Arts and Crafts (with our 40% off coupon of course) and then painted and sealed them with our desired colors.

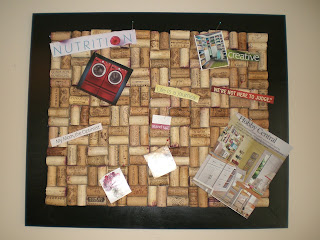
#2- We cut out a piece of solid cardboard to fit in the back of the open frame and proceeded to hot glue the corks onto the cardboard in our desired patterns. (My mom donated some wine corks she found at a yard sale and the rest we purchased on eBay.) Notice in the picture below that the frame is not painted... we used it as a guide while the others were drying but do not glue all your corks down until the frame is painted and ready to go because you will not be able to get the cardboard with the corks attached in or out after they are all glued on.

#3- Hang and enjoy with either photos or as a vision board.


Just looking at these pictures from last summer-- before the baby-- I remembered that I used to be able to make a craft in one sitting. Gone are those days for probably ummm... the rest of my life;) That is okay though, she is totally worth it!!!
**Melissa**